Appearance
Users
Module: Users Where to find it: Top navigation → Users (
/en/system/config/users/list) Who should read this: Portal administrators who invite team members and control which sites and environments each person can work in.
1. Overview
The Users module is where you manage the people who can sign in to your client account. Each user gets:
- A role — the set of privileges they're allowed to use (roles are created in the Roles module).
- Granted sites — which of your sites and which environments within them the user may work in.
Seats (allowed users)
Your account comes with a fixed number of allowed user seats. The logged‑in account owner counts as the first seat. For example, an account that allows 3 users can have the owner plus 2 more.
You can see your usage in two places:
- On a site's dashboard — the Allocated users tile counts everyone who can reach that site.
- On the Users page itself, next to the Add User button (a small
used / totalmeter).
When all seats are used, the Add User button is disabled. If you somehow submit a new user with no seats left, the portal stops you with "You've reached the limit."
2. Prerequisites
Your own role must include the relevant users privileges:
| You want to… | Required privilege |
|---|---|
| See the Users list | Can View Users (CVU) |
| Use Add User (and see the seat meter) | Can Add Users (CAU) |
| Edit a user / Resend invitations | Can Edit Users (CEU) |
| Delete / restore a user | Can Delete Users (CDU) |
Buttons described here only appear if your role includes the matching privilege.
3. The Users list
Open Users from the top navigation.
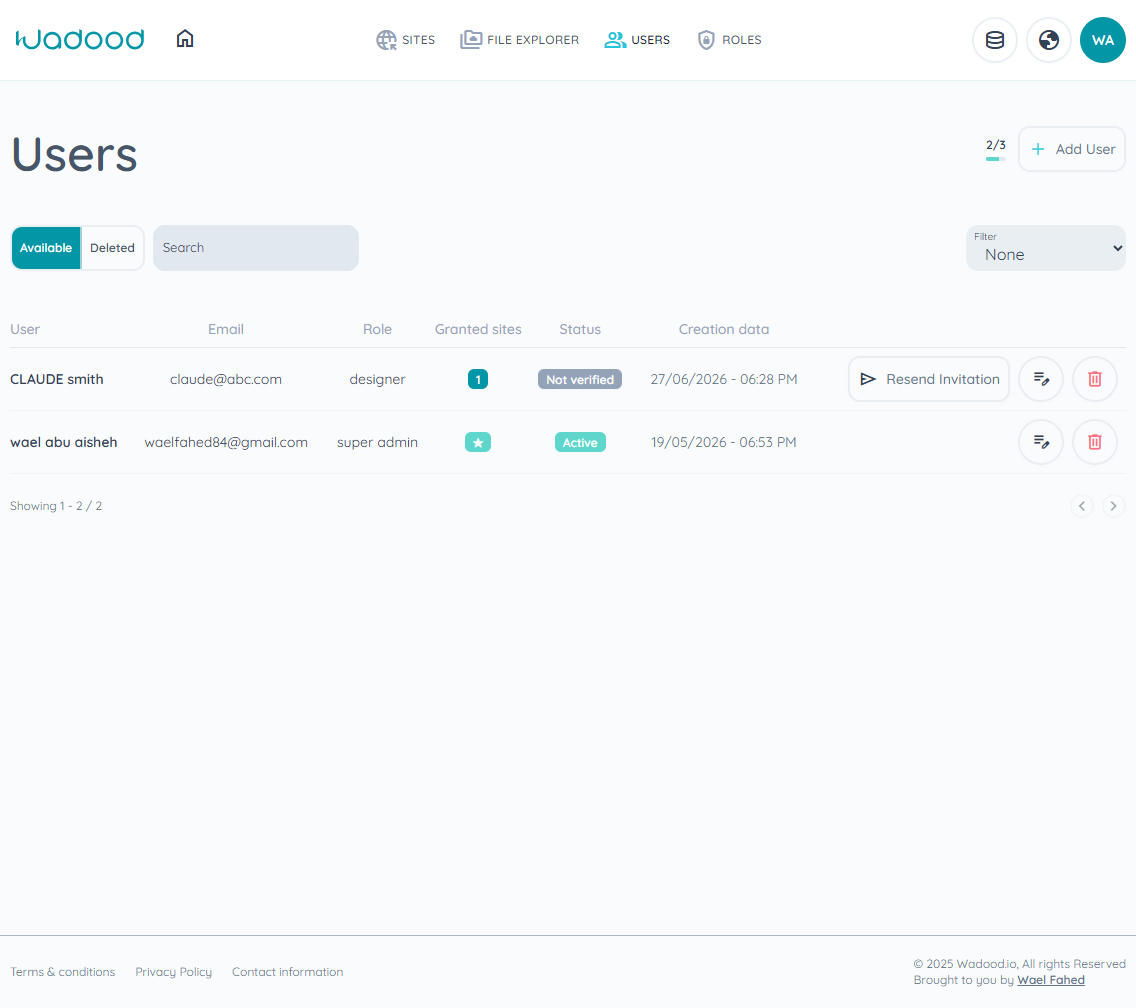
Columns
| Column | Meaning |
|---|---|
| User | The user's full name. |
| The address their invitation is sent to and that they sign in with. | |
| Role | The role assigned to them. |
| Granted sites | A ★ star if they have access to all sites/environments, otherwise a badge with the number of sites they're granted. |
| Status | Active, Not verified, Inactive, or Deleted (see below). |
| Creation data | When the user was created. |
| Actions | Resend invitation, Edit, Delete (and Undo in the Deleted view). |
Status meanings
| Badge | Meaning |
|---|---|
| Active (green) | The user accepted their invitation and is enabled. |
| Not verified (grey) | The invitation was sent but the user hasn't accepted/verified yet. |
| Inactive (grey) | The user is disabled. |
| Deleted (red) | The user is in the bin (shown only under the Deleted tab). |
Finding users
- Available / Deleted tabs — switch between active users and users that have been moved to the bin.
- Search — searches by name/email. Type at least 3 characters before it filters.
- Filter — set the Filter dropdown to By site or By role, then choose a specific site/role to narrow the list. Leave it on None to show everyone.
4. Adding a user
Click + Add User (top‑right). You reach the Add User screen (
/users/manage-user).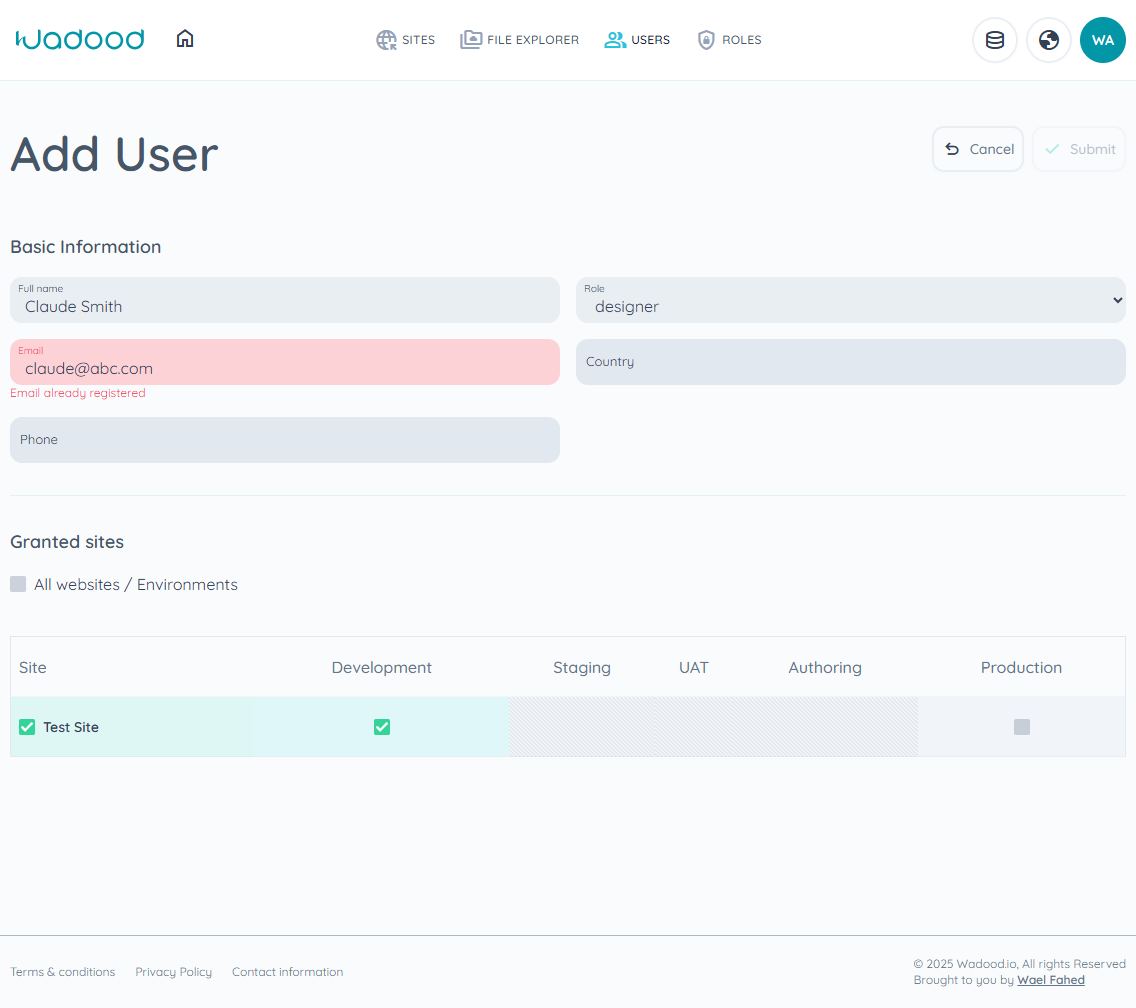
(In the screenshot the email shows a red "Email already registered" warning — a handy example of the uniqueness check described below.)
Fill in Basic Information:
Field Rules Full name Required. Role Required. Choose from your existing roles (created in the Roles module). Email Required, must be a valid email, and must be unique — if it's already in use you'll see "Email already registered". The portal checks this as you type ("Validating email…"). Country Required. This is a type‑ahead field: start typing the country name and pick it from the suggestions (each shows the flag and country code). Phone Required. Do not start with a 0— enter the number without the leading zero (e.g.791234567, not0791234567).Set Granted sites — what the user can access:
- Option A — full access: tick All websites / Environments. The site table disappears; the user can work in every site and every environment. (This section is hidden entirely if you picked a Super‑Admin‑type role, since that role already implies full access.)
- Option B — specific access: leave the box unticked and use the table:
- Tick the site (its row turns green).
- Then tick the environments within that site you want to grant (each ticked environment turns cyan).
Reading the environment columns (Development, Staging, UAT, Authoring, Production):
Cell appearance Meaning A checkbox you can tick That environment is active for the site and can be granted. Greyed / hatched (no checkbox) That environment is not active for the site — nothing to grant. Environment checkbox is locked You haven't ticked the site yet — tick the site first. You must grant at least one site (with at least one environment) unless you chose All websites / Environments.
Click Submit. The button is disabled until every required field is valid.
What happens after saving
- The user is created and an invitation email is automatically sent to their address.
- They appear in the list as Not verified until they accept the invitation, after which they become Active.
5. Editing a user
In the Available tab, click the Edit (pencil) icon on the user's row.
On the Edit User screen you can change the user's Role and Granted sites.
Note: The Full name, Email, Country, and Phone fields are locked (read‑only) when editing. Only role and site access can be changed after a user is created.
Click Submit to save.
6. Resending an invitation
If a user hasn't received or accepted their invitation (status Not verified), anyone with access to the Users module can resend it:
- On the user's row, click Resend Invitation (paper‑plane icon).
- A fresh invitation email is generated and sent. The icon shows an hourglass while sending.
The Resend Invitation button only appears for users who are not yet verified. Once a user has accepted, it disappears.
7. Deleting and restoring users
Deletion happens in two stages — a reversible "bin" step and a permanent step.
Move to bin (soft delete)
- In the Available tab, click the Delete (trash) icon.
- The user is moved to the Deleted tab. This happens immediately with no confirmation, but it is reversible.
- They can no longer sign in.
- Their seat is still counted. A binned user occupies a seat until you delete them permanently — so if you're at your limit, binning someone doesn't free room for the next one.
Restore
- Switch to the Deleted tab and click the Undo (restore) icon on the user's row. They return to Available.
- If they never accepted their invitation, it still works — a binned user keeps their pending invitation link.
Delete permanently
- In the Deleted tab, click the Delete (trash) icon.
- This time a confirmation dialog appears — "Delete User Permanently — This action cannot be undone! proceed?". Only after you confirm is the user removed for good.
- The seat is released here, not at the bin step.
- Anything still pending for that person goes too: an unaccepted invitation, or an unfinished password reset. Their email address is not left behind anywhere, and any invitation link they were sent stops working.
8. Field & validation reference (Add User)
| Field | Required | Validation / notes |
|---|---|---|
| Full name | ✅ | — |
| Role | ✅ | Pick from existing roles |
| ✅ | Valid email format; must be unique ("Email already registered") | |
| Country | ✅ | Type‑ahead; must pick a real country |
| Phone | ✅ | Digits only, must not start with 0, 7–13 digits |
| Granted sites | ✅* | At least one site+environment, unless "All websites / Environments" is ticked |
* Not applicable when a Super‑Admin‑type role is selected (the section is hidden).
9. Tips & common pitfalls
- Out of seats? The Add User button is greyed out when your account has no free seats. Delete or restore‑then‑remove an unused user, or request more seats, to free one up.
- Phone won't validate? Remove the leading
0(and any+/ country code prefix) — enter just the national number starting with a non‑zero digit. - Email already registered means that address is already attached to a user (possibly a deleted one). Use a different address.
- Granting a site but not an environment does nothing useful — remember to tick at least one environment column after selecting the site.
- Greyed environment columns aren't a bug — they're environments that aren't active for that site. Activate them in the Sites module if the user needs them.
- Editing can't fix a typo in the name/email — those fields are locked after creation. If they're wrong, delete the user and create them again.