Appearance
Localization
Module: Localization Where to find it: Inside a site → site menu (the apps grid icon) → Localization. Scope: Per site and per environment — pick the environment at the top of the list before working. Who should read this: Administrators who manage the translated text (labels, messages, button captions, etc.) that visitors see on the website.
1. Overview
Localization is where you manage the translations that appear on your website. Instead of hard‑coding text into every page, you define reusable keywords (e.g. Greeting) and give each one a translation in every language the site supports. Pages, layouts, and shared elements then reference the keyword, and the site renders the right language for each visitor.
The module has two levels:
| Concept | What it is |
|---|---|
| Localization group | A container that holds keywords (e.g. a "Common" group, a "Checkout" group). |
| Keyword | A single translatable entry inside a group, with one translation per site language. |
Each group is Global or Local:
| Type | Behaviour |
|---|---|
| Global | Its keywords are available on every page of the site/environment — nothing extra to wire up. |
| Local | Its keywords are available only on the pages you attach to the group. You explicitly pick which pages may use it. |
Localization is environment‑scoped: groups and keywords you create under Development are separate from Production, and move between environments through the Sync Manager like other content.
2. Prerequisites
- The site must already have its languages configured (under Sites). The number of translation inputs you see per keyword equals the number of languages defined for the site — e.g. a site with Arabic + English shows two inputs.
- Localization uses three privilege sets — groups, keywords, and pages:
| Action | Privilege |
|---|---|
| View localization groups | Can View Localization Groups (CVLG) |
| Add a group | Can Add Localization Groups (CALG) |
| Edit a group | Can Edit Localization Groups (CELG) |
| Delete a group | Can Delete Localization Groups (CDLG) |
| View keywords | Can View Localization Keywords (CVLK) |
| Add a keyword | Can Add Localization Keywords (CALK) |
| Edit a keyword | Can Edit Localization Keywords (CELK) |
| Delete a keyword | Can Delete Localization Keywords (CDLK) |
| Attach/detach pages to a local group | Can Edit Localization Pages (CELP) |
3. The Localization Groups list
Open Localization. The landing view lists the groups for the selected environment.
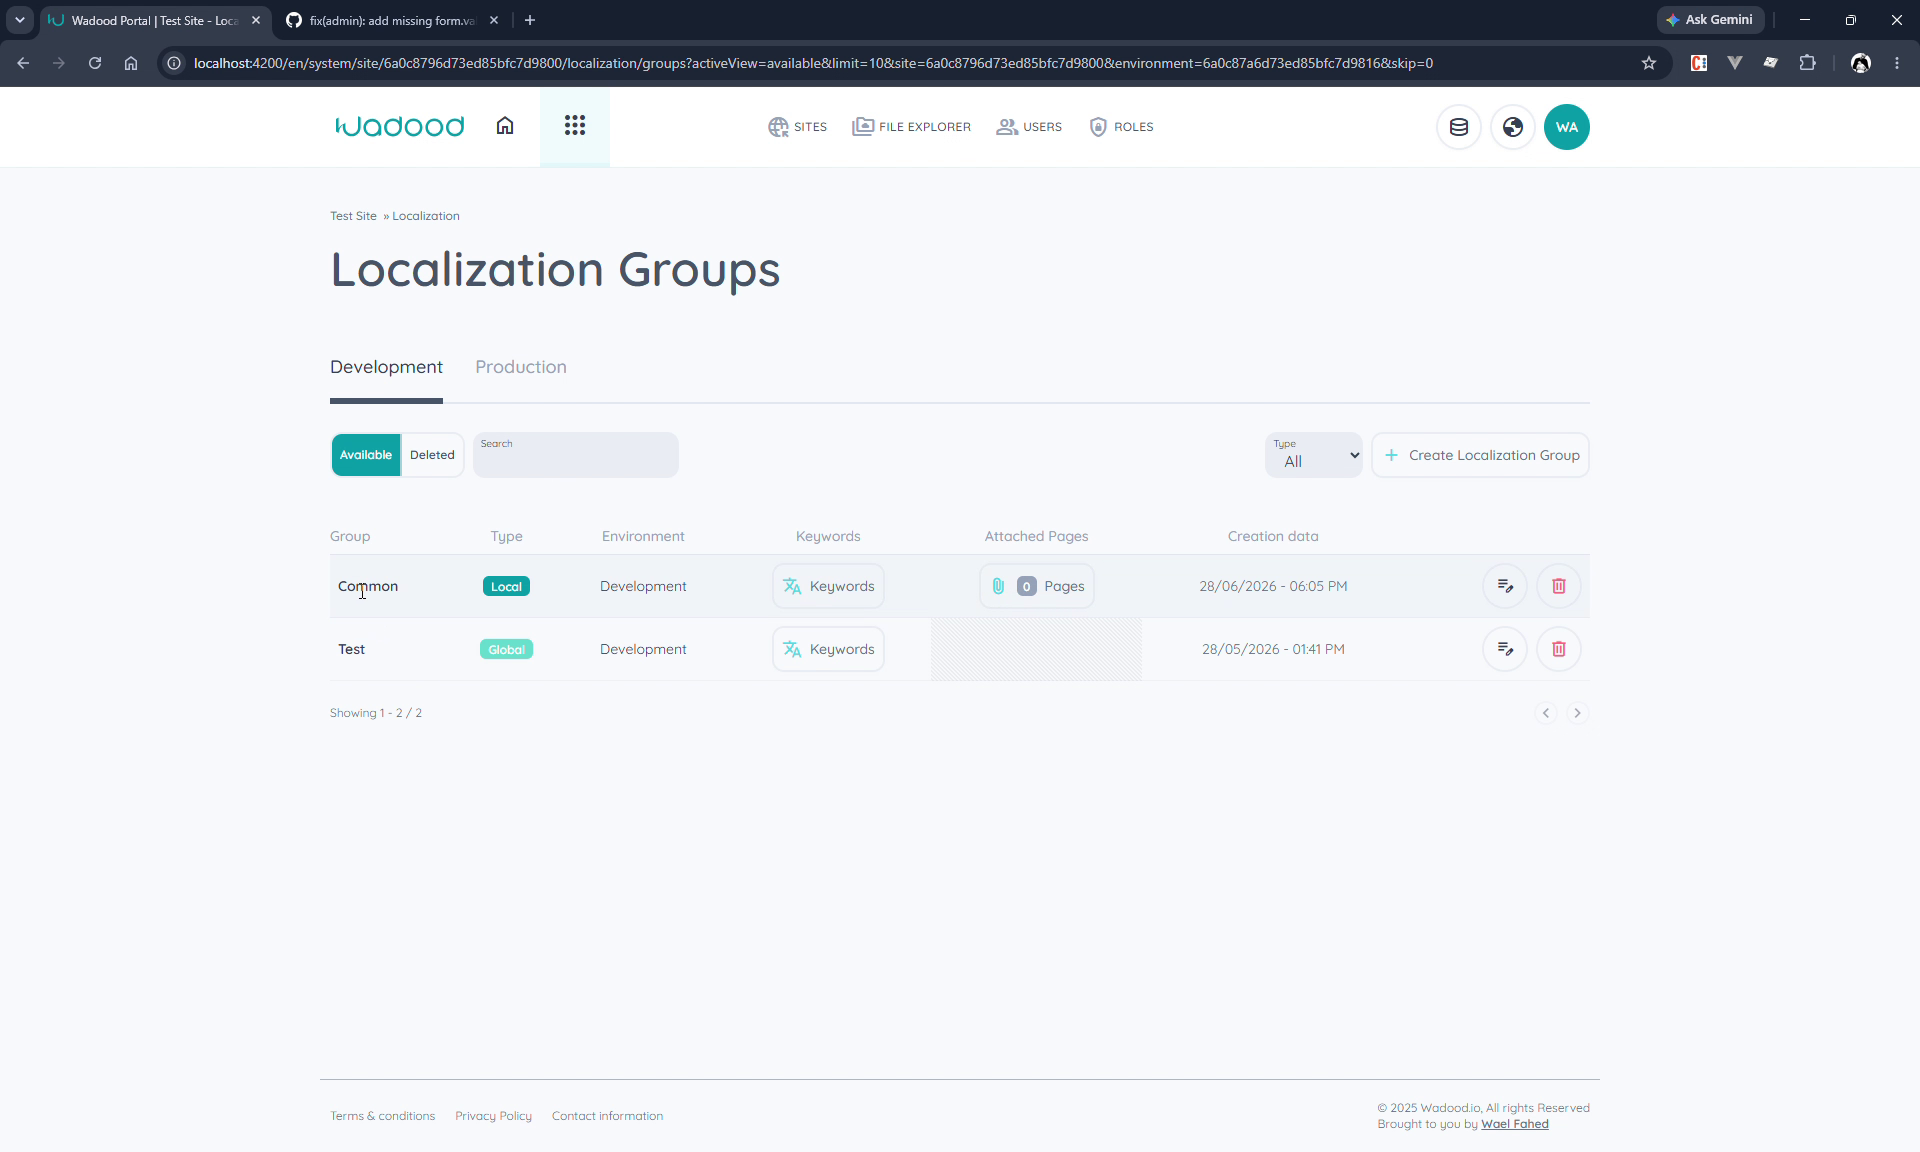
Controls on this screen:
- Environment tabs (e.g. Development, Production) at the top — switch the environment you're editing.
- Available / Deleted tabs — toggle between live groups and the recycle bin.
- Search — filter groups by name.
- Type filter — All, Global, or Local.
- Create Localization Group — add a new group (requires
CALG).
The table shows each group's Group name, Type badge (Global / Local), Environment, a Keywords link (opens the keyword editor), an Attached Pages link (local groups only — shows the count), and the Creation date, plus edit and delete actions.
4. Creating a localization group
Click Create Localization Group.
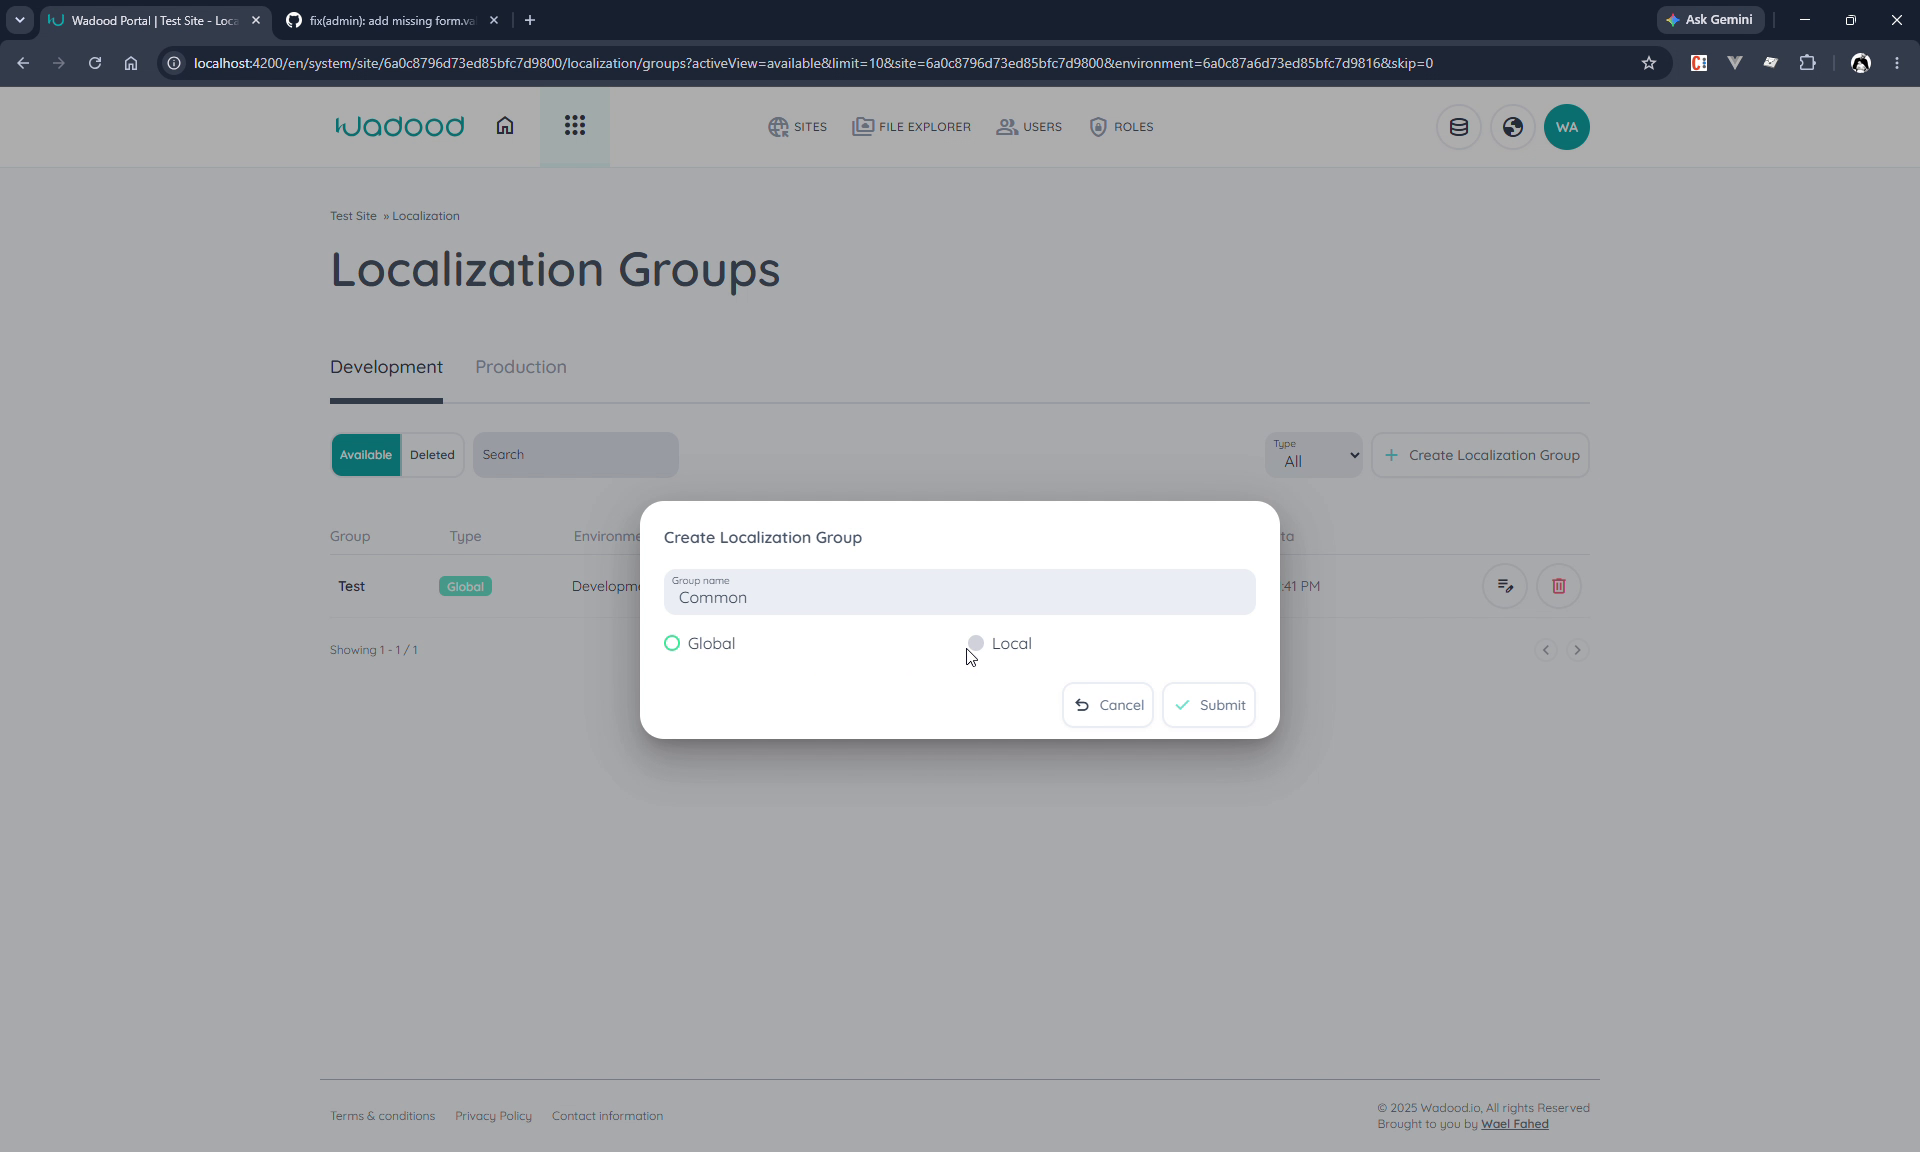
| Field | Notes |
|---|---|
| Group name | Required (e.g. "Common", "Checkout"). Up to 100 characters. |
| Type | Choose Global or Local (radio). |
Click Submit. The new group appears in the list, and the search updates to surface it.
Choosing Global vs. Local: start Global when the text is used site‑wide (navigation labels, footer, common buttons). Choose Local when a group of keywords belongs to a specific set of pages and you don't want it loaded everywhere.
5. Attaching pages to a Local group
A Local group only reaches the pages you attach to it. From the group's row, open Pages (the Attached Pages link).
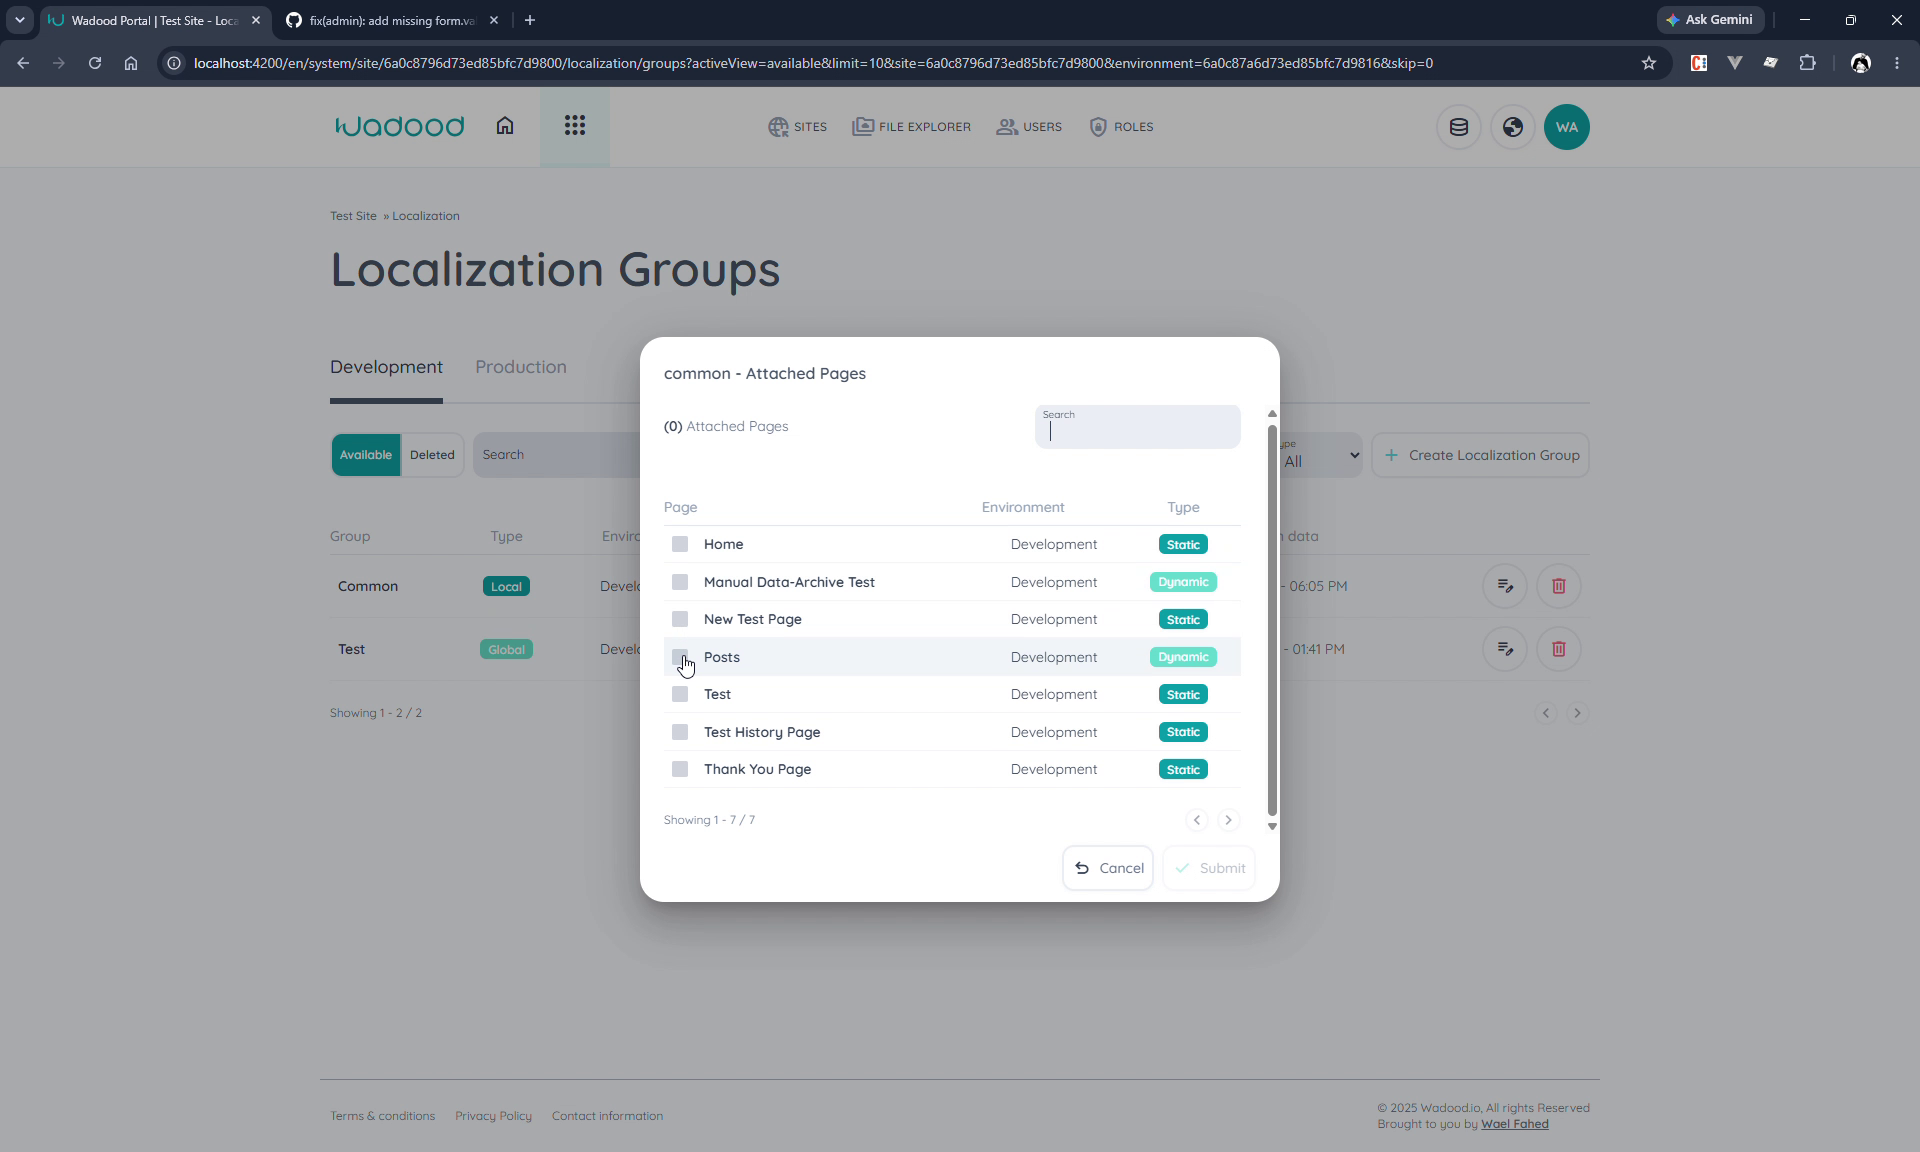
The dialog lists every page in the current environment, each with:
- A checkbox to include/exclude the page (requires
CELP). - The page Environment.
- A Type badge — Static or Dynamic.
Use the search box and paginator to find pages, tick the ones that should use this group, and click Submit. The count next to the group updates to reflect the attached pages.
Switching a group from Local to Global removes all its page attachments — once a group is global it applies everywhere, so the explicit page links are no longer needed.
6. Managing keywords
From a group's row, click Keywords to open its keyword editor. The heading shows the group name with its Global/Local badge.
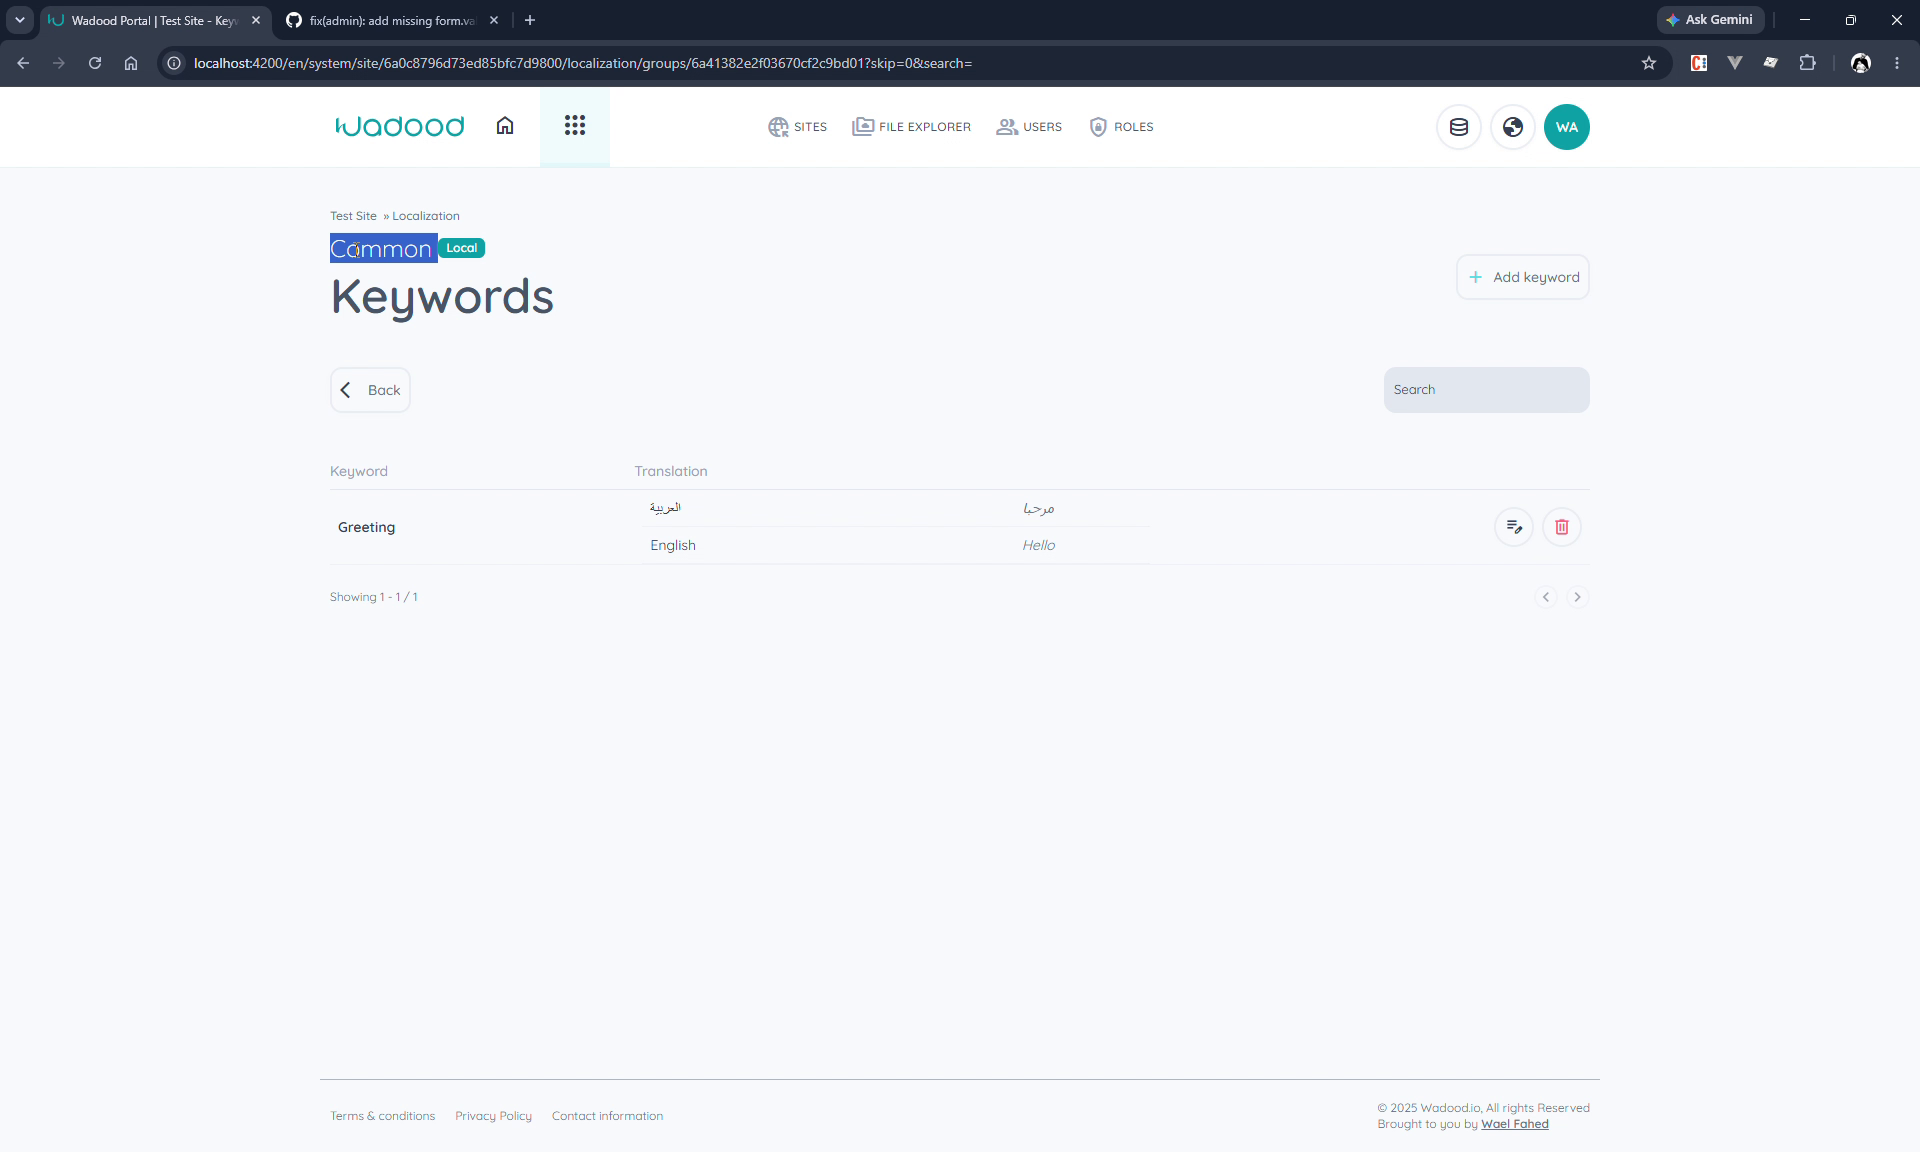
The table lists each Keyword and its Translation broken down per language, with edit and delete actions per row. Use search to filter by keyword.
6.1 Adding a keyword
Click Add keyword.
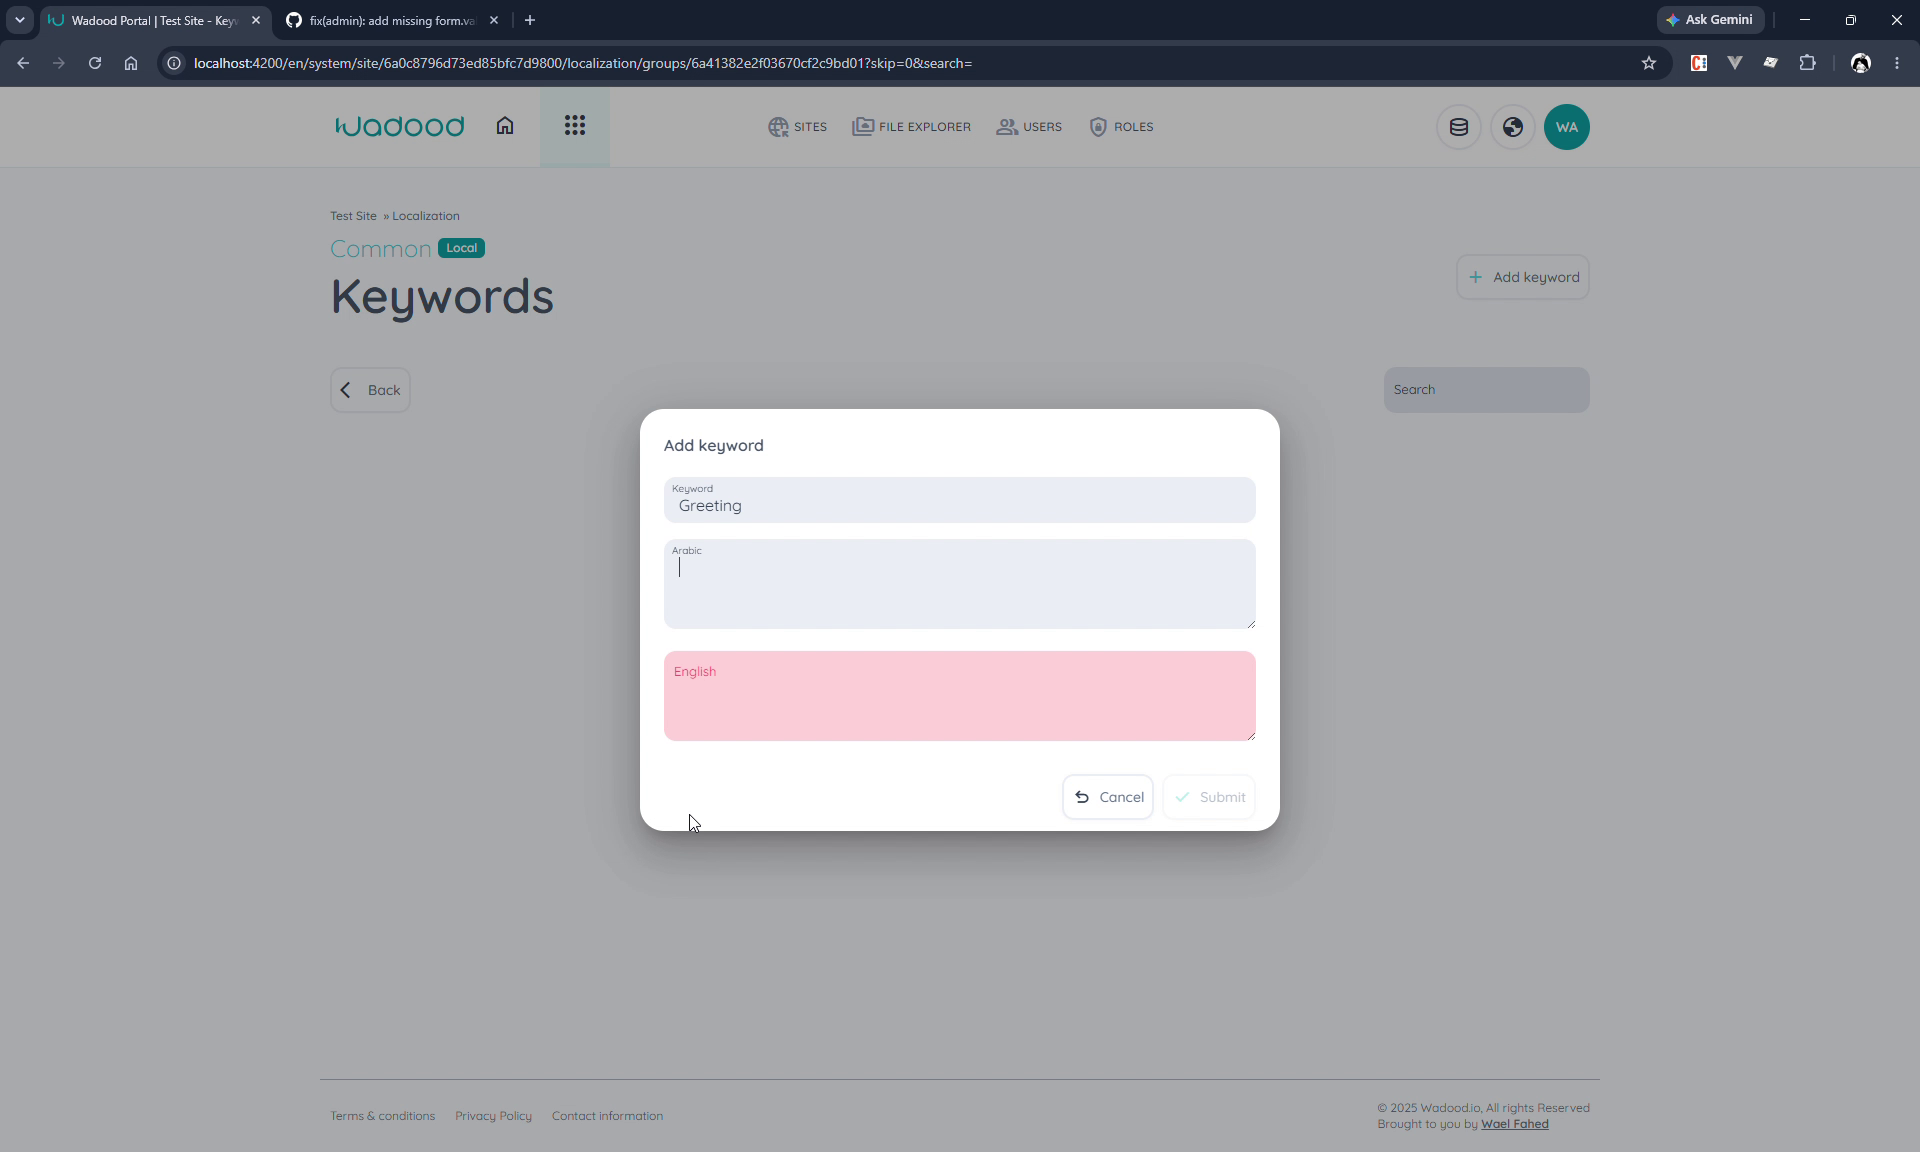
| Field | Notes |
|---|---|
| Keyword | The identifier you'll reference from pages (e.g. Greeting). Required. No spaces and no quotation marks allowed. |
| One input per language | A textarea for each site language (e.g. Arabic, English). Enter the translation for each. Up to 500 characters. |
Click Submit. The keyword appears in the list with its per‑language translations (e.g. Greeting → العربية "مرحبا" / English "Hello").
6.2 Editing and deleting keywords
- Edit (
CELK) re‑opens the dialog so you can change the keyword name or any translation. - Delete (
CDLK) removes the keyword and all its language translations.
A keyword stores one entry per language internally, grouped under a single keyword name. Editing replaces the whole set, so you always edit all languages together in one dialog.
7. Using a keyword on a page
Once a keyword exists, reference it from the page builder in either of two ways:
- Localization component — add a component → Content → Localization, then Browse keyword and pick the keyword. (For a Local group, the page must be attached to that group; Global keywords are always available.)
- HTML element — add an HTML element with the
wd-localizationdirective and set the keyword name as its inner text.
The same keyword can be used inside pages, layouts, and shared elements.
8. Deleting and restoring groups
- Delete moves a group to the Deleted tab (soft delete) — it can be restored from there.
- Permanent delete (from the Deleted view, with a confirmation prompt) removes the group and all its keywords and page attachments for good.
9. Tips & common pitfalls
- Define site languages first. The number of translation boxes per keyword comes from the site's configured languages — add a language under Sites before you expect its input to appear here.
- Global = everywhere, Local = attached pages only. If a keyword "isn't found" on a page, check whether its group is Local and whether that page is attached.
- Keyword names are strict: no spaces, no quotation marks. Keep them short and consistent (e.g.
Greeting,checkout_submit). - Work in the right environment. Groups are per environment; create/translate in the environment you intend, then promote with the Sync Manager.
- Switching Local → Global drops page links — expected behaviour, not a bug.
10. Troubleshooting: "my Local keyword doesn't show on a page"
This is the most common point of confusion, and it's expected behaviour, not a bug:
A Local group's keywords are only available on the pages that are attached to that group (see §5). If you browse keywords on a page that isn't in the group's Attached Pages, you'll only see Global keywords — the page simply has no access to that Local group.
If a Local keyword is missing on a page:
- Open the group's Attached Pages dialog.
- Confirm the page you're editing is ticked.
- If not, attach it and Submit, then reload the page builder.
(Global groups skip all of this — their keywords are available everywhere.)