Appearance
Roles & Privileges
Module: Roles Where to find it: Top navigation → Roles (
/en/system/config/roles/list) Who should read this: Portal administrators who manage what other users are allowed to do.
1. Overview
Roles are reusable permission sets. Instead of granting abilities to each user one by one, you create a role (for example Designer, Content Editor, Reviewer), switch on the exact privileges that role should have, and then assign the role to users in the Users module.
A role is made of two things:
- A name — a unique label that identifies the role (e.g. "Content Editor").
- Privileges — the individual actions the role is allowed to perform, organised into 13 functional groups (Pages, Templates, Data Store, Users, …). In total there are 81 privileges you can mix and match.
Once a role is saved, anyone assigned that role inherits its privileges across the portal. The interface itself reacts to privileges: buttons such as Create Role, Edit, and Delete only appear for users whose role includes the matching privilege.
2. Prerequisites
To work with roles, your own role must include the relevant roles privileges:
| You want to… | Required privilege |
|---|---|
| Open the Roles list / see roles | Can View Roles (CVR) |
| Use the Create Role button | Can Add Roles (CAR) |
| Use the Edit action | Can Edit Roles (CER) |
| Use the Delete action | Can Delete Roles (CDR) |
If a button described in this guide is missing for you, your role is most likely lacking the corresponding privilege above.
3. The Roles list
Open Roles from the top navigation bar. You land on the Roles list.
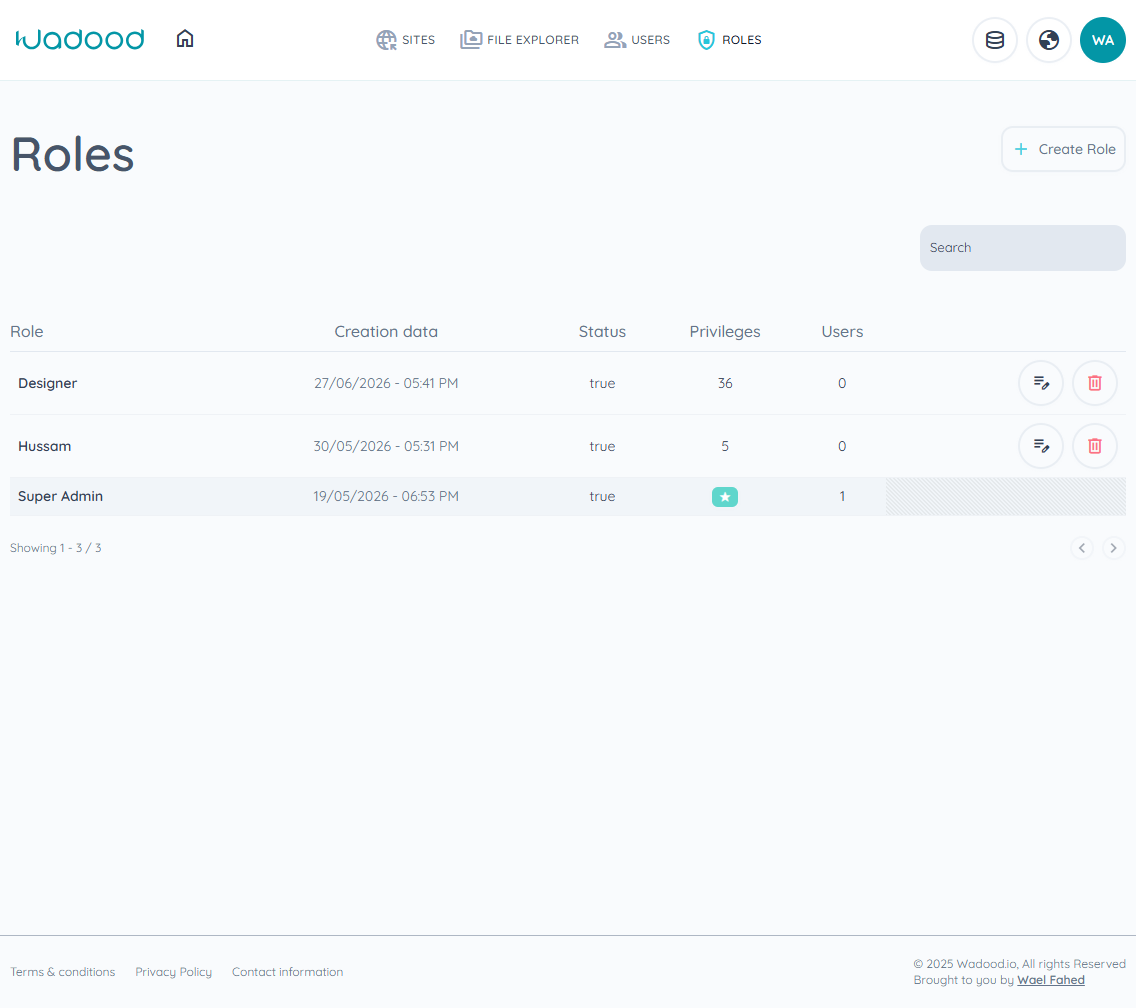
What you see
| Column | Meaning |
|---|---|
| Role | The role name. Displayed with a capital first letter. |
| Creation data | The date and time the role was created (e.g. 27/06/2026 - 05:41 PM). |
| Status | Whether the role is active (true / false). |
| Privileges | The total number of individual privileges granted to the role. The built‑in Super Admin role shows a ★ star instead of a number, meaning it has every privilege. |
| Users | How many users are currently assigned to this role. |
| Actions | Edit (pencil/notes icon) and Delete (trash icon). |
Things to know
- Search — the search box (top‑right of the table) filters the list by role name as you type. It is case‑insensitive.
- Pagination — the list shows 10 roles per page. Use the
‹/›arrows beneath the table to move between pages. The footer shows e.g. "Showing 1 - 3 / 3". - The Super Admin role is protected — it always shows the ★ star and has no Edit or Delete buttons. It cannot be modified or removed from this screen.
4. Creating a role
On the Roles list, click + Create Role (top‑right). You are taken to the Create Role screen (
/roles/manage-role).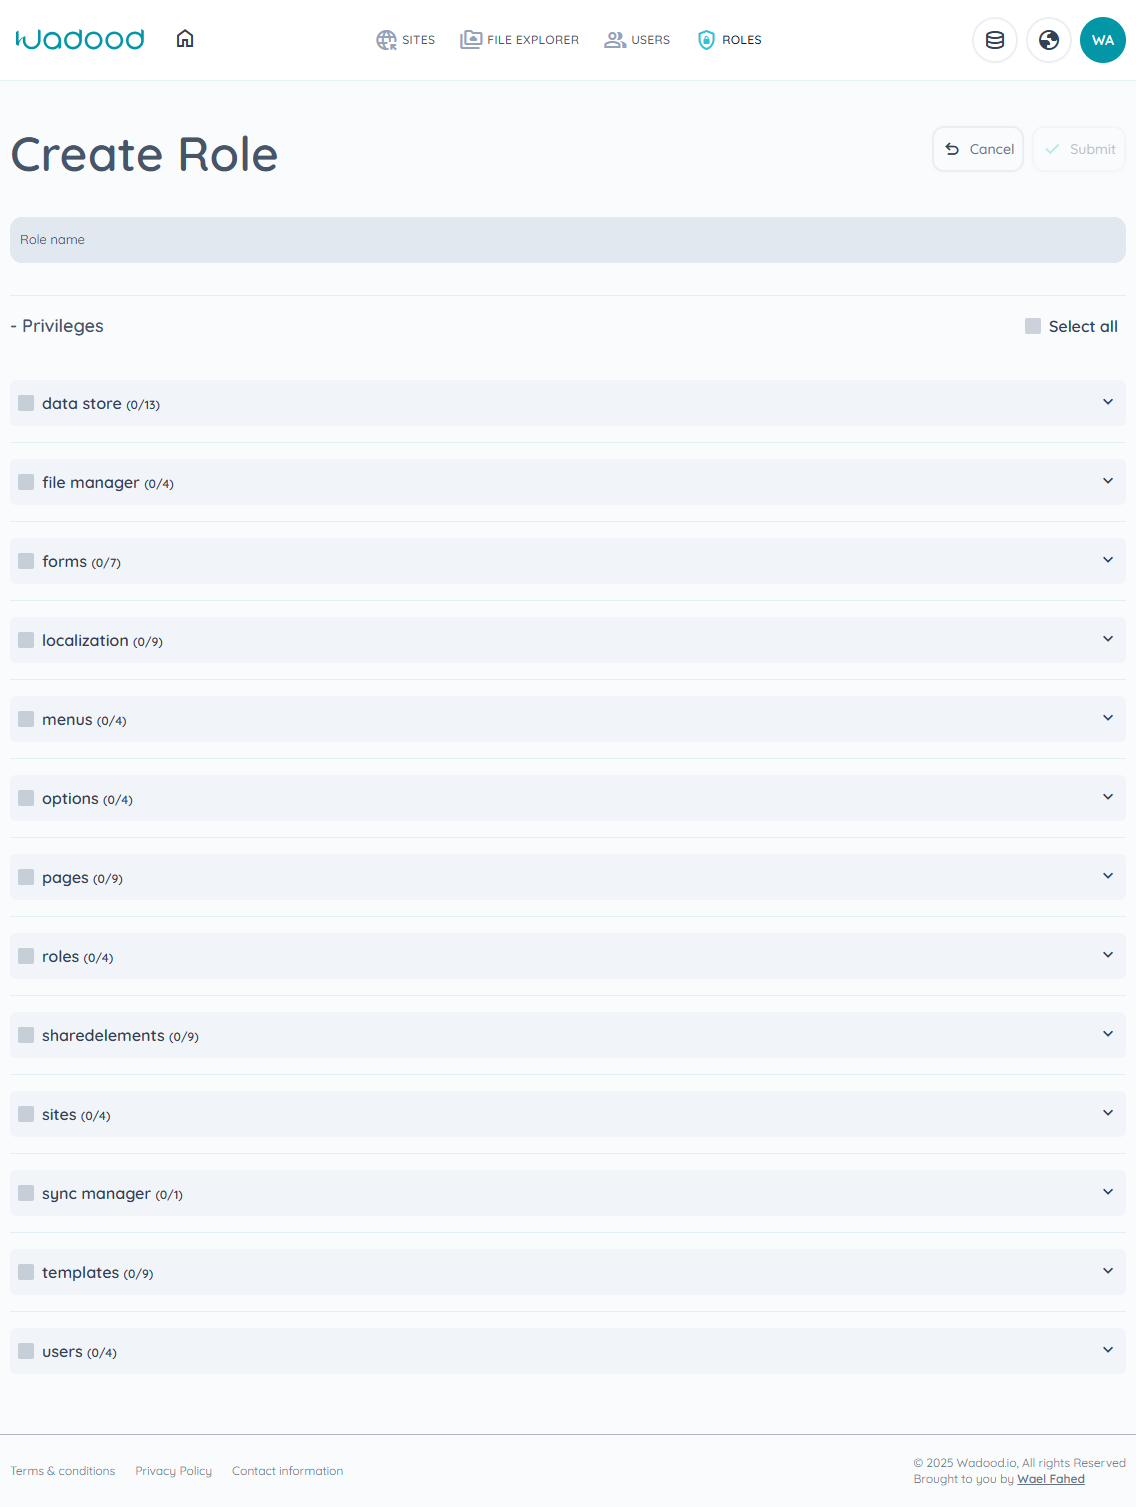
Enter a Role name. The name is required and must be unique — if you type a name that already exists, you'll see "Role name must be unique" and you won't be able to save. As you type, the section heading updates to read "{Role name} - Privileges".
Choose privileges. Below the name is the Privileges area: 13 collapsible groups. For each group:
- Click the group row (the ˅ / ˄ chevron on the right) to expand it and reveal its individual privileges, laid out in two columns.
- Tick individual privileges, or tick the group's own checkbox (next to the group name) to select/clear all privileges in that group at once.
- Each group header shows a live counter, e.g.
file manager (4/4)= 4 of 4 selected.
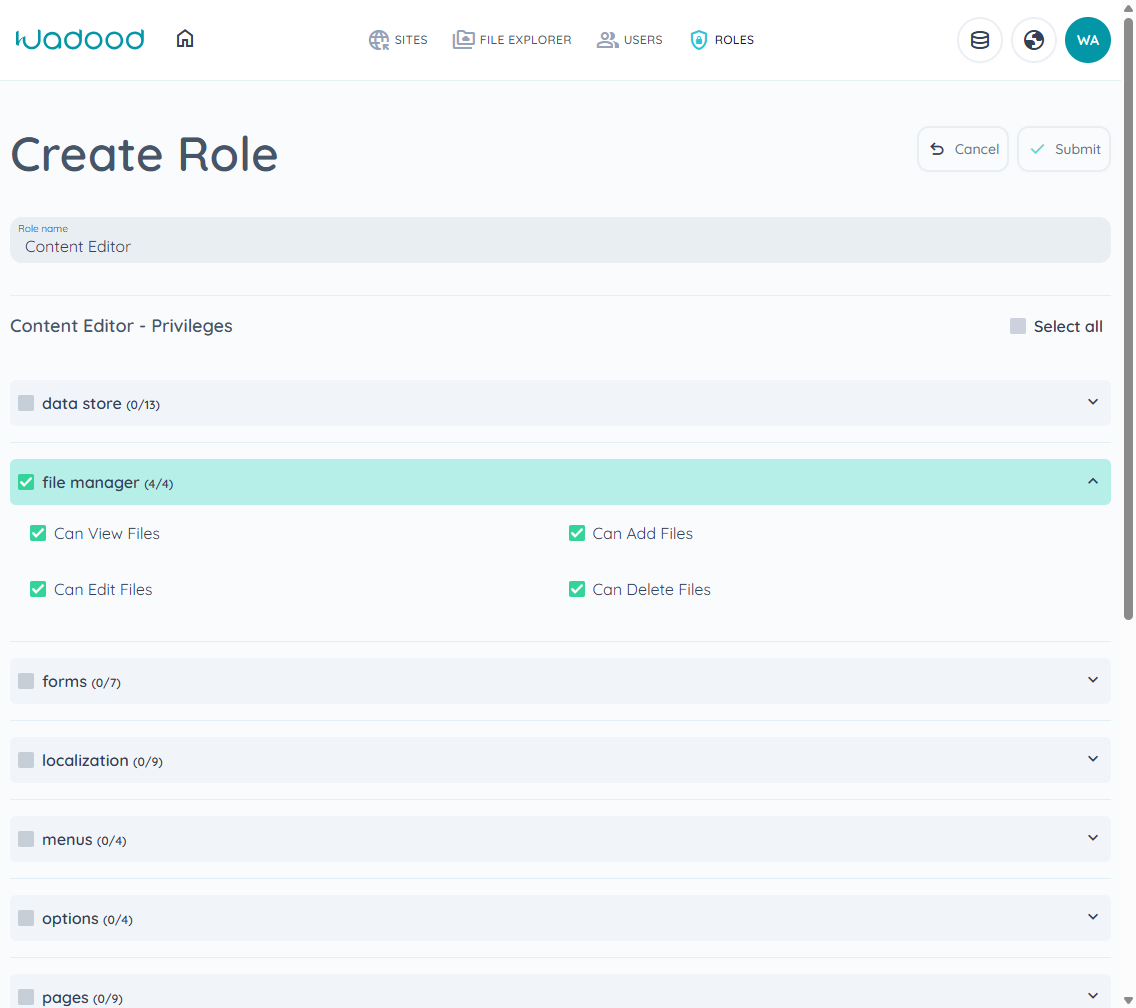
Colour cues tell you a group's state at a glance:
Colour Meaning Grey No privileges selected in this group Cyan / teal Some privileges selected (partial) Green All privileges in the group selected - Select all (top‑right, next to the Privileges heading) ticks every privilege in every group in one click. Clicking it again clears everything.
Submit. Click Submit (top‑right). The button stays disabled until:
- you have made at least one change, and
- the form is valid (a name is present and at least one privilege is selected).
On success you'll see a green confirmation toast — "Role added successfully" — and the new role appears in the Roles list.
Cancel / leaving the page: Click Cancel to return to the list without saving. If you try to navigate away with unsaved changes, the portal asks you to confirm before discarding them.
5. Editing a role
- On the Roles list, click the Edit (pencil) icon on the role's row. The Edit Role screen opens, pre‑filled with the role's current name and privileges (
/roles/manage-role/{roleId}). - Change the name and/or toggle privileges exactly as on the Create screen.
- Click Submit. You'll see "Role updated successfully".
The Privileges number on the list reflects your changes immediately (it is the sum of all individual privileges granted).
The Super Admin role has no Edit icon and cannot be edited.
6. Deleting a role
- On the Roles list, click the Delete (trash) icon on the role's row.
- The role is removed and you'll see "Role deleted permanently".
⚠️ Important behaviours
- Deletion is immediate — there is currently no extra confirmation pop‑up for deleting a role. Click carefully.
- A role that still has users assigned cannot be deleted. If the Users count is greater than 0, deletion is blocked and you'll see "Unable to delete role — Un‑assign users first!". Re‑assign or remove those users (in the Users module) before deleting the role.
- The Super Admin role has no Delete icon and cannot be deleted.
7. Privilege reference (all 13 groups)
The table below lists every privilege group and the individual privileges inside it, as they appear in the Create/Edit Role screen. Counts in parentheses are the number of privileges in each group.
data store (13)
Can View Data Store · Can View Data Categories · Can Add Data Categories · Can Edit Data Categories · Can Delete Data Categories · Can View Data Schema · Can Add Data Schema · Can Edit Data Schema · Can Delete Data Schema · Can View Data Items · Can Add Data Items · Can Edit Data Items · Can Delete Data Items
file manager (4)
Can View Files · Can Add Files · Can Edit Files · Can Delete Files
forms (7)
Can View Custom Forms · Can Add Custom Forms · Can Edit Custom Forms · Can Delete Custom Forms · Can View Custom Form Submissions · Can Edit Custom Form Submissions · Can Delete Custom Form Submissions
localization (9)
Can View Localization Groups · Can Add Localization Groups · Can Edit Localization Groups · Can Delete Localization Groups · Can View Localization Keywords · Can Add Localization Keywords · Can Edit Localization Keywords · Can Delete Localization Keywords · Can Edit Localization Pages
menus (4)
Can View Menus · Can Add Menus · Can Edit Menus · Can Delete Menus
options (4)
Can View Option Groups · Can Add Option Groups · Can Edit Option Groups · Can Delete Option Groups
pages (9)
Can View Pages · Can Add Pages · Can Edit Pages · Can Delete Pages · Can Add Page Versions · Can Delete Page Versions · Can Edit Pages Versions · Can Edit Pages UI · Can View Pages UI
roles (4)
Can View Roles · Can Add Roles · Can Edit Roles · Can Delete Roles
sharedelements (9)
Can View Shared Elements · Can Add Shared Elements · Can Edit Shared Elements · Can Delete Shared Elements · Can Add Shared Element Version · Can Edit Shared Element Version · Can Delete Shared Element Version · Can View Shared Element UI · Can Edit Shared Element UI
sites (4)
Can View Sites · Can Add Sites · Can Edit Sites · Can Delete Sites
sync manager (1)
Can Sync Site Data
templates (9)
Can View Layouts · Can Add Layouts · Can Edit Layouts · Can Delete Layouts · Can Add Layout Versions · Can Delete Layout Versions · Can Edit Layouts Versions · Can Edit Layouts UI · Can View Layouts UI
Note on the "templates" group: the group is labelled templates but its individual privileges are named "Layouts". These refer to the same feature (page layouts / templates).
users (4)
Can View Users · Can Add Users · Can Edit Users · Can Delete Users
8. Tips & common pitfalls
- A role needs at least one privilege to be saved. With a name but zero privileges, Submit stays disabled.
- Names must be unique. Re‑using an existing role name blocks saving.
- Use the group checkbox and "Select all" to save time instead of ticking privileges one by one.
- "View" privileges are usually the foundation. Granting an "Add/Edit/Delete" privilege without the matching "View" privilege can lead to a role that can act on items it can't browse — when in doubt, include the relevant Can View … privilege.
- The Privileges count on the list is a total of individual privileges, not groups. A role with all of file manager (4) + all of pages (9) shows 13.
- Delete is permanent and un‑confirmed — and is blocked while users are still assigned.