Appearance
Sites
Module: Sites Where to find it: Top navigation → Sites (
/en/system/config/sites/list) Who should read this: Portal administrators who create and manage the websites hosted on the platform.
1. Overview
Sites is the largest core module — it's where you create and run the actual websites. A single account can host multiple sites, limited only by your plan's data storage (e.g. the free plan includes 15 MB).
Two concepts are central to this module:
- Languages — each site can serve one or more languages, each reachable under a URL prefix (e.g.
/en,/ar). One language is marked the default. - Environments — each site can have up to five environments: Development, Staging, UAT, Authoring, Production. Each environment has its own hostname (domain/sub‑domain), its own publish status, and its own settings. This lets you work on a site in Development while Production stays live.
Creating a fully working public site involves three stages:
- Build it — name, languages, environments, scripts, metadata (the Add/Edit Site screen).
- Activate it — publish the site and its environment(s).
- Connect & verify the domain — point your DNS at the platform and verify ownership (the Site Configuration screen).
2. Prerequisites
Your role must include the relevant sites privileges:
| You want to… | Required privilege |
|---|---|
| See the Sites list | Can View Sites (CVS) |
| Add a site | Can Add Sites (CAS) |
| Edit, Configure, publish/unpublish | Can Edit Sites (CES) |
| Delete / terminate a site | Can Delete Sites (CDS) |
Buttons described here only appear if your role includes the matching privilege.
3. The Sites list
Open Sites from the top navigation. Opening a site lands you on its dashboard, which summarises what that site contains and what has recently changed in it.
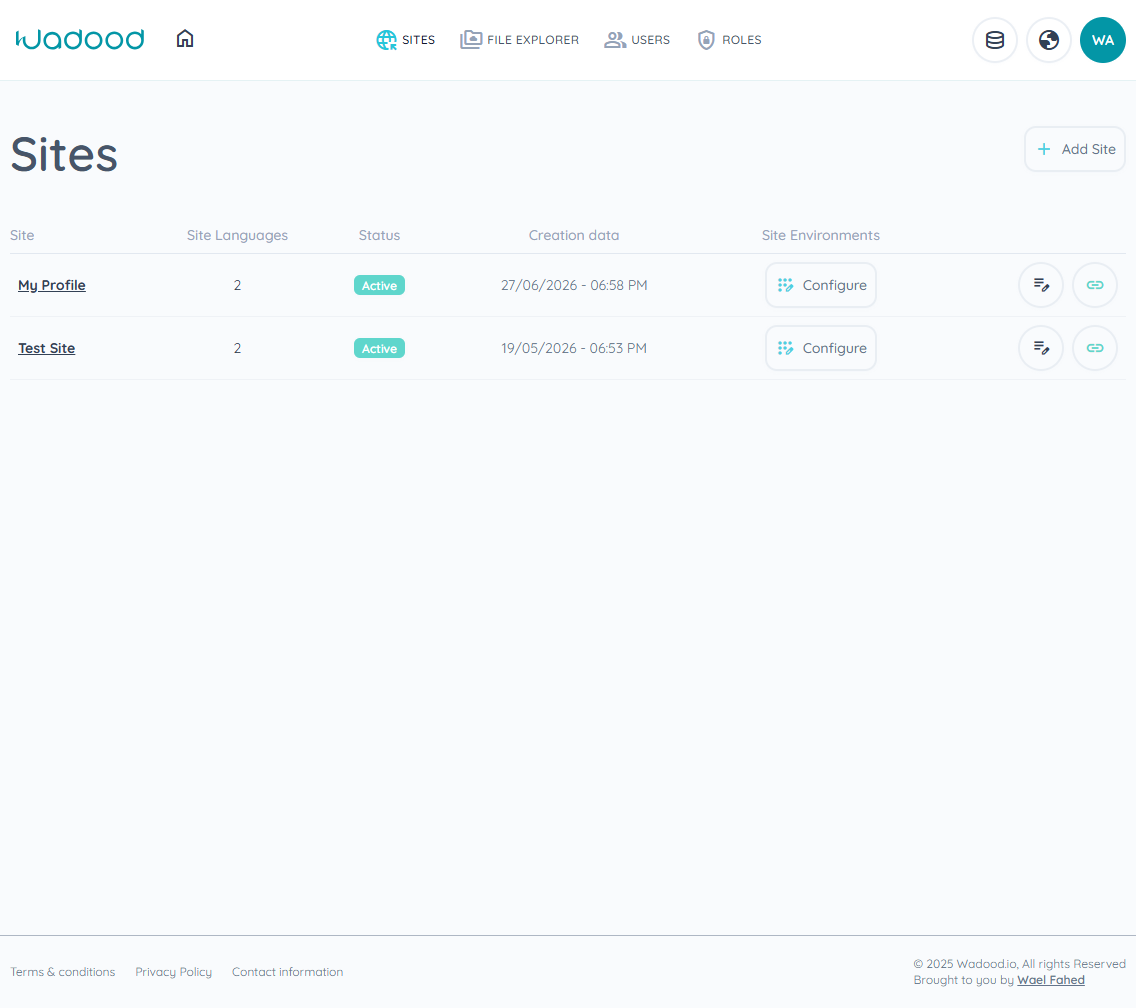
| Column | Meaning |
|---|---|
| Site | The site name (click it to open the site's workspace). |
| Site Languages | How many languages the site serves. |
| Status | Active, Inactive, or Deleted. |
| Creation date | When the site was created. |
| Site environments | Holds the Configure button → opens Site Configuration. |
| Actions | Edit (pencil) and the publish toggle (chain icon). |
The publish toggle (important)
The chain icon at the end of each row is the site‑level publish switch:
- Green (linked) = the site is active.
- Red (unlinked) = the site is deactivated.
Toggling it off deactivates the whole site and all its environments; toggling it on reactivates the site. A brand‑new site starts inactive, so you'll use this to bring it online.
4. Creating a site
Click + Add Site. A site is built across tabs. Initially only the first tab — Basic Info — is available; the other three appear after you save the basic info (because they need a site to attach to).
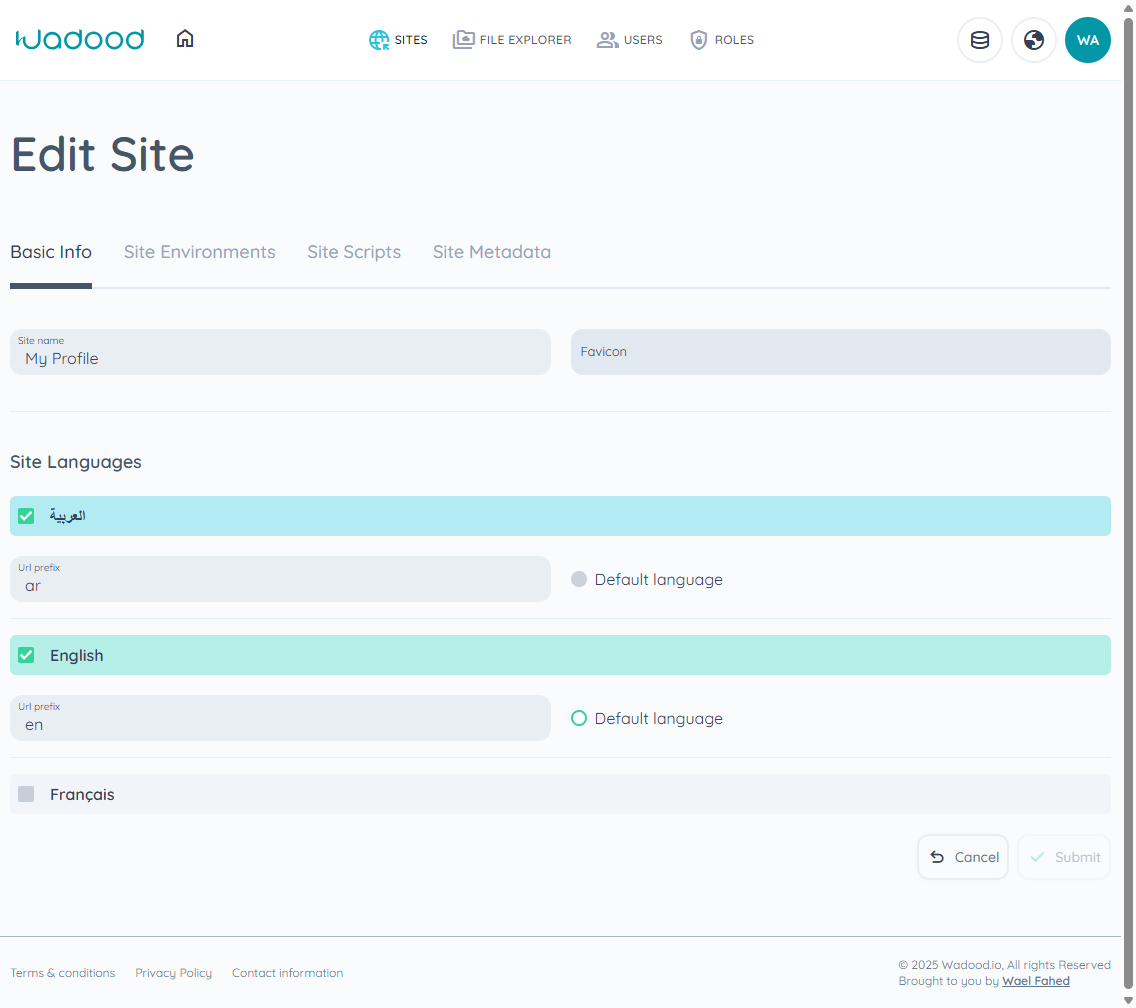
4.1 Basic Info
| Field | Notes |
|---|---|
| Site name | Required. |
| Favicon | Optional. A path/URL to the site's icon (a .ico file). |
| Site Languages | Tick each language the site should support. |
For each selected language:
- Url prefix — required, the path segment for that language (e.g.
en,ar). It appears after the hostname, e.g.waelprofile.com/en. - Default language — pick exactly one language as the default with its radio button. You must choose a default; until you do, a warning shows: "You must select a default language."
- The default language is what the site opens in when no language prefix is present in the URL. For example, with English as default, visiting
waelprofile.comserves the English version, whilewaelprofile.com/arserves Arabic.
- The default language is what the site opens in when no language prefix is present in the URL. For example, with English as default, visiting
Colour cues: the default language row is highlighted green; other selected languages are cyan; unselected languages stay grey.
Click Submit. The three remaining tabs now appear.
4.2 Site Environments
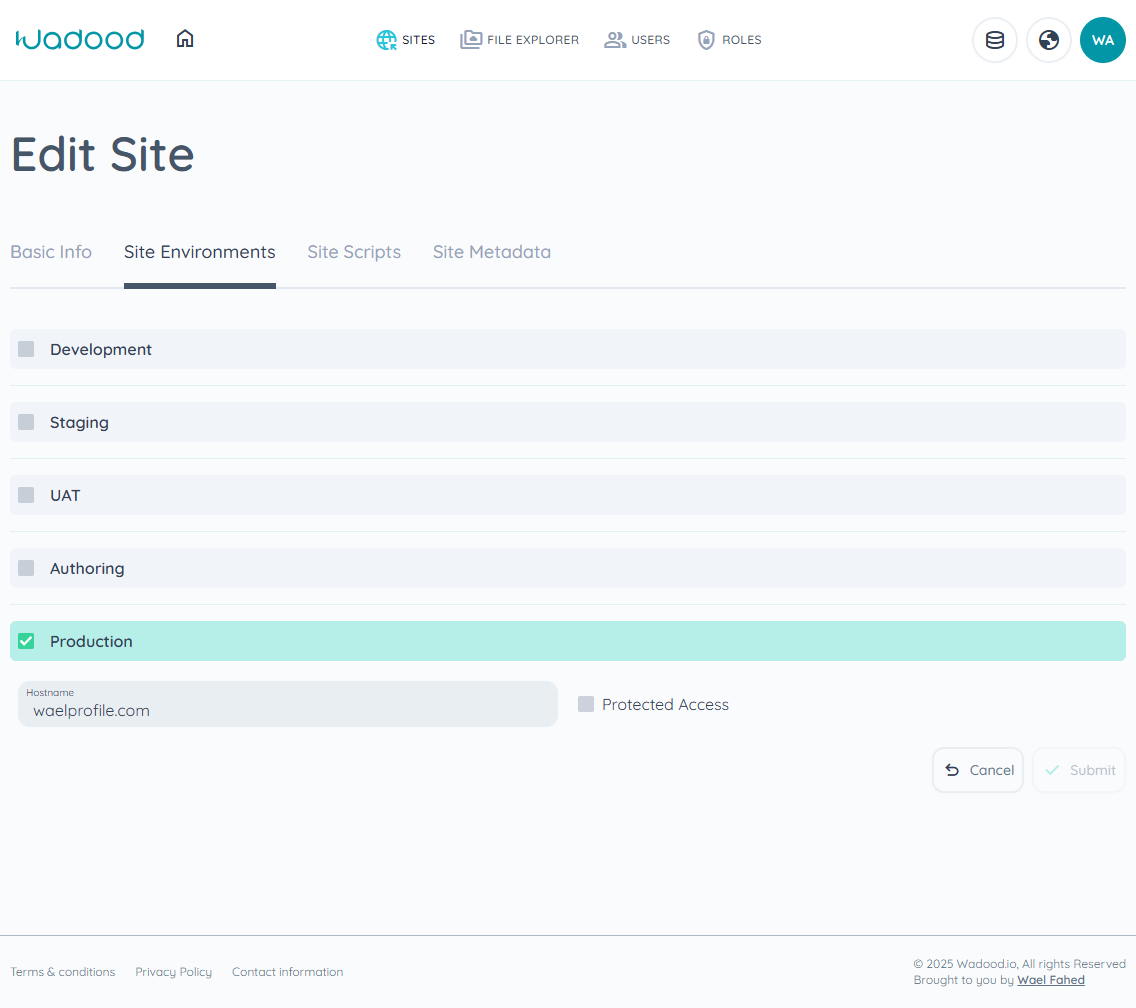
Tick the environments this site should have (e.g. just Development and Production). For each selected environment:
- Hostname — required. The domain or sub‑domain for that environment, e.g.
dev.waelprofile.comfor Development andwaelprofile.comfor Production. It's validated as a URL. - Protected Access — optional checkbox. When enabled, only users granted access to that environment can view it; anyone else is shown a login screen before the site loads. (Useful for keeping a staging/dev environment private.)
Click Submit.
4.3 Site Scripts
Add third‑party scripts (Google Analytics, Facebook Pixel, etc.) per environment.
- Click Add Script. In the dialog:
- Script Title — a label for your own reference (e.g. "Google Analytics"). Required.
- Environment — which environment the script is injected into (e.g. Production only). Required.
- Script — paste the code into the editor. Required.
- Save the dialog, then Submit the tab.
Each script appears as a card. You can reorder scripts by dragging the move handle (the injection order on the page follows this sequence) or delete one with the trash icon.
4.4 Site Metadata
Add <meta> tags to inject into the site's pages (e.g. the responsive viewport tag).
- Click Add Metadata. Build the tag from attribute key/value pairs (e.g.
name = viewport, then addcontent = width=device-width, initial-scale=1.0) and choose the target environment(s). - Each metadata entry shows a live preview of the final tag, e.g.
<meta name="viewport" content="width=device-width, initial-scale=1.0" />. - Reorder by dragging, or delete with the trash icon. Submit the tab.
Unsaved‑changes protection
If you switch tabs (or leave the screen) with unsaved edits, the portal warns you with a "Discard changes" prompt. Choose Discard to leave without saving, or Cancel to stay and keep editing. Always Submit a tab before moving on.
5. Activating a site
A newly created site is inactive. To bring it online:
- Activate the site — on the Sites list, toggle the site's publish switch to green (Section 3).
- Publish the environment(s) and verify the domain — done on the Site Configuration screen (next section).
6. Site Configuration
Open it via the Configure button on the Sites list, or from inside a site's workspace using the site menu (the grid icon in the top bar) → Site Configuration.
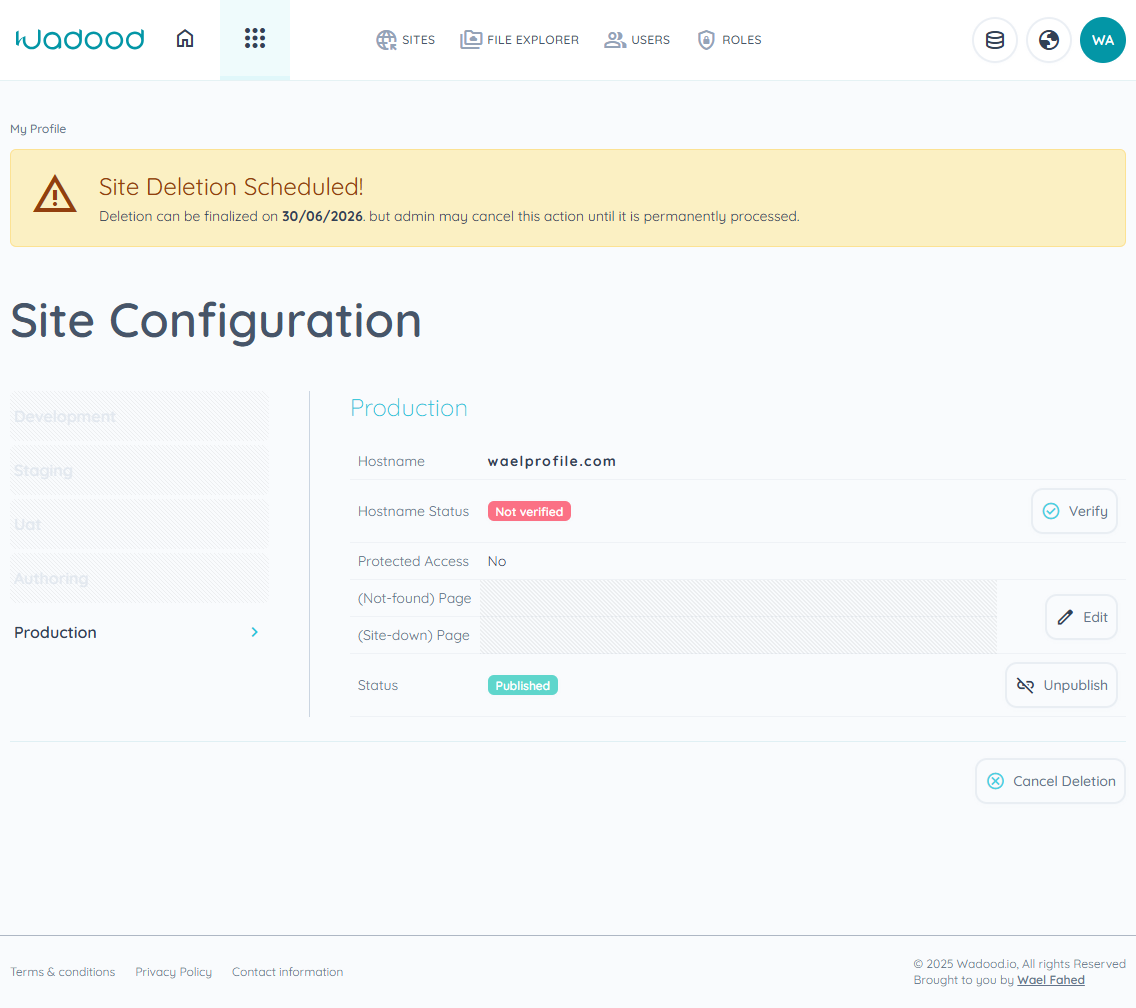
On the left is the list of environments (inactive ones are greyed out). Select an environment to manage it on the right:
| Item | What it shows / does |
|---|---|
| Hostname | The domain configured for this environment. |
| Hostname Status | Verified (green) or Not verified (red). If not verified, a Verify button appears. |
| Protocol | Appears only after the hostname is verified. Shows the protocol (http/https) and the public IP address you must point your domain to — click it to copy. Create a DNS A record for your hostname pointing at this IP. |
| Protected Access | Whether the environment is access‑restricted (Yes/No). |
| (Not‑found) Page | The page shown to visitors for unknown URLs. Click Edit to choose a page. |
| (Site‑down) Page | The page shown when the environment is unpublished/down. Click Edit to choose a page. |
| Rendered content | A Flush cache button that drops this environment's saved copies of your pages, so the next visitor gets a freshly built one. See below — you will rarely need it. |
| Status | Published / Unpublished, with a Publish / Unpublish button for this environment. |
Flushing the page cache
To keep your site fast, the platform saves a copy of each page after it builds it and serves that copy to the next visitor instead of building it again.
You will almost never need to flush it by hand. Publishing anything — a page, a layout, a shared element, a menu, a form, a keyword — drops this environment's saved copies automatically. That is the normal path, and it needs no action from you.
The button exists for the cases the platform cannot see:
- Content that reaches your pages from an external data source changed at the source.
- Something was changed directly in your data rather than through the admin.
- You are looking at a page that seems out of date and want to rule the cache out entirely.
It is safe to press. Nothing is deleted and nothing is published. The saved copies are simply discarded, and each page is rebuilt the next time somebody asks for it — so at worst the first visitor after a flush waits the extra moment the page normally takes to build.
It affects only the environment you are looking at. Flushing Production does not touch Development, and vice versa.
Flushing is not publishing
A flush shows visitors the current published version, rebuilt. It does not make draft or unpublished work live — if a change is not published, flushing will not reveal it.
Verifying the domain (DNS)
Because you bring your own domain, you must prove you own it:
- Click Verify next to Hostname Status. A dialog opens with instructions.
- Log in to your domain provider's DNS settings and add the record shown:
- Name: (your hostname)
- Type:
TXT - Value: (the verification code shown)
- Back in the dialog, click Verify. DNS changes can take a few minutes to propagate, so you may need to retry.
Once the DNS lookup returns the expected value, the status flips to a green Verified badge.
Pointing your domain at the platform
After the hostname is verified, a new Protocol row appears in the table showing the public IP address of the platform. To make the site reachable on your domain:
- Copy the public IP from the Protocol row (click it to copy).
- In your domain provider's DNS settings, create an A record for the hostname that points to that IP.
Your domain now resolves to the platform, and (once the environment is published) the site is live.
On a local development setup verification can't complete (there's no public DNS), so the hostname stays Not verified and the Protocol row with the public IP won't appear there. You'll see it on a real, verified production environment.
7. Exporting your data
Your content is yours, and you can take a copy of it at any time — you don't have to ask us.
On Site Configuration, under Export & import your data, click Export Data. The browser downloads a single JSON file named wadood-<site-name>-<date>.json containing that site: pages with their elements, settings, metadata and routes; layouts and shared elements with their elements and settings; menus; localization; Data Store schemas, categories and items; forms, form fields and all form submissions; plus the site's environments, languages, scripts and media records.
The current site, not its history
The file captures the site as it stands now — for each page, the version that is live in each language, and the same for each layout and shared element. Earlier versions in your history are not in the file.
That's deliberate. Page content is stored per version, so a site with a long editing history would produce a file many times larger than the site itself, most of it drafts you replaced months ago. Keeping the current version makes the file a usable picture of your site — and something that can be rebuilt from.
A page you have never published still exports: it falls back to its most recent version, so no page ever comes out empty. Each version keeps its published/draft flag, so it's clear which pages were live.
Items you've deleted but not yet purged are included, marked isDeleted: true. They're still restorable in the admin, so leaving them out would quietly lose them.
It's your source, not a folder of web pages
This is the question people ask first, so it's worth being clear: the export is not a set of .html and .css files you can open in a browser.
Wadood doesn't store your pages as HTML. It stores them the way the builder edits them — one row per element, each carrying its tag, its classes, its element id, its own CSS, and where it sits in the tree. Page-level scripts sit alongside in the page's settings. The renderer turns that into HTML when someone visits your site.
So the export gives you the complete source model — nothing about your page is missing from it — but it's structured data, not markup:
| Looking in the file for… | You'll find it under |
|---|---|
| A page's structure | pageElements — tag, classes, element_id, parentElement, sequence |
| CSS written on a single element | the styles field on that row in pageElements |
| A page's stylesheets | pageSettings.styles (style, styleTitle, per language) |
A page's embedded <style> blocks | pageSettings.embeddedStyles (raw markup in tag) |
| A page's scripts | pageSettings.scripts (script, scriptTitle, sequence) |
A page's embedded <script> blocks | pageSettings.embeddedScripts (raw markup in tag) |
| Event handlers on an element | pageElements.elementEvents |
| Which shared elements a page uses | pageSettings.sharedElements |
| A page's URL | pageRoutes (slug) |
| Which layout a page uses | pageConfigurations |
| Page SEO tags | pageSettings.metaData and pageMetaData |
| Site-wide scripts | scripts (top level) |
| Site-wide SEO tags | site.metaData |
Layouts and shared elements follow the same pattern — templateSettings and sharedElementSettings carry their styles, embedded styles, scripts and embedded scripts in exactly the same fields.
If what you actually want is the rendered markup for one page, open that page in the builder and use its source view — that gives you the HTML as the renderer produces it.
Only a super‑admin can export. A permission such as CES is not enough — the file contains every form submission on the site, which is personal data belonging to your visitors, so the platform keeps the extract to account owners. Every export is recorded in the activity log ("Exported the site data"), so you can always see who took a copy and when.
What the file does not contain:
| Not included | Why |
|---|---|
Rendered .html / .css files | See above — you get the source model instead, which is complete. |
| Earlier versions of a page | See above — the file holds the current version of each page in each language. |
| Media and form attachments (the actual image/PDF bytes) | The file would be enormous. mediaLibrary lists the file records with the name and path you need to fetch each one separately. That list is account-wide, since the media library is one pool shared across all your sites. |
| Private API headers on Data Store schemas | The values are credentials. The key names are kept so the shape is recognisable, but the values come out blank. |
| Passwords, access tokens, API keys | Never exported. |
| Activity logs, sync queues, editor locks | Operational records, not your content. |
| Your other sites | The export is scoped to the one site you ran it from. Run it once per site. |
The file starts with a wadoodExport block recording the format version, when it was taken, who took it, and a count of every collection — so a file found months later explains itself. The same block repeats the caveats above in plain text.
Handle the file carefully
Form submissions contain personal data about your site visitors, and you are the controller of that data. Once the file is on your machine, keeping it safe is your responsibility.
Tip: Take an export before you delete a site (below). Deletion is permanent once finalised, and we do not keep a copy for you.
8. Importing a site
Site Configuration → Import Data takes an export file and rebuilds this site from it. It's how you restore a site you've broken, or copy one site's content into another.
It replaces, it does not merge. Everything currently on the site is deleted and the file's content takes its place. There's no "add to what's already here" — two pages can't share a URL, two pages can't both be the default, and there's no right way for us to guess which one you meant. If you want to bring some content across, import into a spare site and use the Sync Manager, which is built for exactly that.
Your site's setup is untouched. Environments, hostnames, verified DNS, protected access and enabled languages all belong to the site, not the file. That's the whole reason import lands on an existing site instead of creating a new one — you don't have to re-verify a domain to restore your content.
How it goes
- Choose the file. Nothing is changed yet.
- Read what will happen. The platform opens the file, tells you which site it came from and what's in it, and counts what's about to be destroyed on this site. This is your chance to notice you picked the wrong file.
- Confirm with a code. We email you a verification code, the same protection deleting a site carries.
It might refuse, and it will say why
| Why | What to do |
|---|---|
| The file uses a language this site hasn't enabled | Enable that language on this site first, then import again. Content in a language a site doesn't have would never render. |
| The file has content for an environment this site doesn't have | Create that environment first. |
| The file isn't a Wadood export, or came from a newer version | Check you picked the right file. |
Form submissions go too
Importing deletes the form submissions currently on this site — those are your visitors' enquiries, and they cannot be recovered. Export this site first if there's any chance you'll want them. The confirm screen offers exactly that.
Things worth knowing
- You get the site as the file captured it — the current version of each page, not the version history of the site you're overwriting.
- Items you'd deleted but not purged come across too, still marked as deleted.
- Media isn't in the file, but your media library is shared across your whole account and import doesn't touch it, so images your pages reference keep working.
- Only a super-admin can import, and every import is recorded in the activity log.
9. Deleting a site
Deleting a site is deliberately a multi‑step, reversible process protected by an email one‑time code.
- On Site Configuration, click Delete Site (requires
CDS). A caution appears: "CAUTION! DELETE WEBSITE — By confirming this action, this website and all related data will be deleted. This action cannot be undone." - Confirm. The platform emails a one‑time verification code (OTP) to your account email.
- Enter the code in the Confirm Action dialog and submit.
- The site is now scheduled for deletion. A banner shows the date it will be finalised — 3 days from today — e.g. "Site Deletion Scheduled! Deletion can be finalized on 30/06/2026, but admin may cancel this action until it is permanently processed." The site's status also changes on the dashboard.
Changing your mind
- Cancel Deletion — during the 3‑day window, click Cancel Deletion (on Site Configuration) to call off the scheduled deletion and restore the site.
- Delete Site Permanently — only after the planned date passes does a Delete Site Permanently button appear, which terminates the website and frees its storage for good.
10. Reference
Environments
| Environment | Typical use |
|---|---|
| Development | Active building / experimentation |
| Staging | Pre‑release testing |
| UAT | User‑acceptance testing |
| Authoring | Content authoring |
| Production | The live, public site |
Key fields & validation
| Field | Required | Notes |
|---|---|---|
| Site name | ✅ | — |
| Favicon | — | Path/URL to a .ico |
| Url prefix (per language) | ✅ | Validated pattern; e.g. en, ar |
| Default language | ✅ | Exactly one |
| Hostname (per environment) | ✅ | Valid URL/domain |
| Protected access | — | Per environment |
| Script Title / Environment / Script | ✅ | All three required per script |
11. Tips & common pitfalls
- A new site is inactive — remember to flip the publish toggle on the Sites list, and publish the environment in Site Configuration, before it's reachable.
- You can't save Basic Info without a default language — pick the default radio for one of your selected languages.
- The extra tabs (Environments / Scripts / Metadata) only show after the first save — save Basic Info first.
- Submit each tab separately — switching tabs doesn't save; watch for the "Discard changes" prompt.
- Domain verification needs a public domain + DNS access — it can't be completed on a local environment.
- Protected Access turns an environment into a login‑gated preview — handy for Development/Staging you don't want public.
- Deletion is reversible for 3 days — and requires an emailed OTP to start. If you change your mind, use Cancel Deletion before the planned date.
- Export before you delete — the export is the only copy you'll get; we don't keep one after a site is permanently deleted.
- Import replaces, it never merges — and it takes the current form submissions with it. Export first if you might want them.
- Storage limits adding sites — if you're out of storage, free some (e.g. permanently delete an old site) before adding a new one.
Note: Deeper day‑to‑day site configuration (building pages, menus, etc.) lives in other modules and is covered in their own guides.